

Lesson # 7: Register Domain Name in One Place and Host It Through Another Host (Updating DNS Settings)
Last Update: September 16, 2013In Lesson 3, we briefly touched on this topic. Our recommandation was to register your domain through 1and1 and host it through iPage shared hosting plan. The reason for this recommandation is that domain names registered thorugh 1and1 come with free domain privacy option, which has a value of $10 per year. I'm sure that you will agree that this option will pay off big time in a long run. At the current rate, you will be saving at least $60 over the period of six years.
Another reason for registering a domain name seperately from your hosting provider is when you need a country-specific domain name extension not offered by your host. For example, iPage doesn't offer .ca or .eu domain registration.
Registering a domain name in one place and hosting it through another host is done by updating DNS settings. So, the questions, along with a real hands-on example, we will be answering in this lesson are: What is DNS and How Do You Update DNS Setting?
What is DNS?
DNS stands for Domain Name Server. The main function of DNS is to connect your domain name with your hosting account. For your website to work and to be accessible via the Internet, the DNS settings must be set up properly. When you register and host a domain name through the same hosting provider, this is done automatically. However, when you register a domain name through one company and host it through another host, this must be done manually.
How Do You Update DNS Settings?
In this example, the domain name is registered through 1and1 with the objective of hosting it through iPage hosting, but the same principle applies to other domain name registrars and web hosts.Let's assume that you are already inside your iPage control panel.
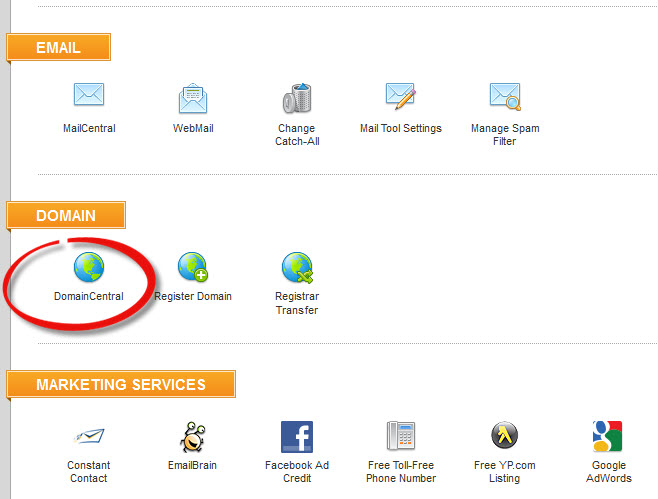
1. Click on the DomainCentral icon
Screenshoot #1: iPage Control Panel
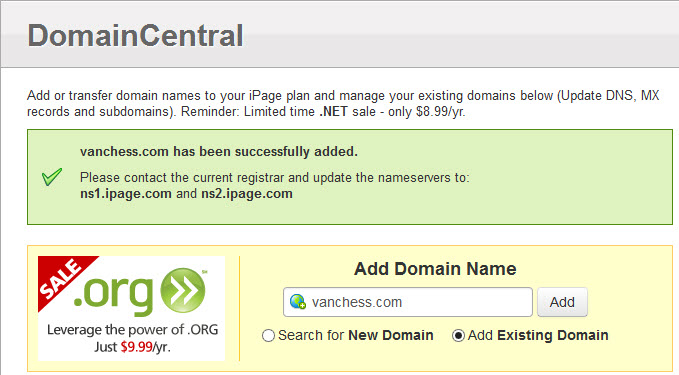
2. Select "Add Existing Domain"
3. Type your existing domain name and click the "Add" button
Screenshot #2: DomainCentral
.jpg)
You will notice that the domain name has been successfully added. Notice the instruction: "Please contact the current registrar and update the nameservers to: ns1.ipage.com and ns2.ipage.com."
So, what does that mean? NameServers ns1.ipage.com and ns2.ipage.com are in a sense saying "we are now ready to serve vanchess.com domain name. Let vanchess.com registrar know that."
As mentioned already, we registered vanchess.com through 1and1.com.
Screenshot #3: DomainCentral - Domain Successfully Added
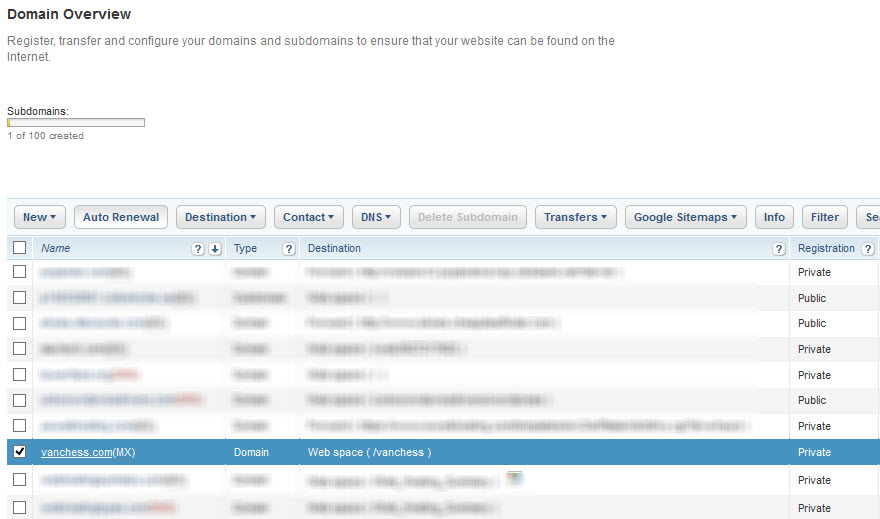
4. Access your 1and1 Control Panel and Select "Domains"
That's where you will see all of your domain names registered through 1and1.com. We have multiple domain names, but you may have only one at this stage.
Once again, the domain that we want to host through iPage is vanchess.com
5. From the domain name list, check the box that corresponds to the domain that you want to host through iPage.com - (this is labelled as #1 in the screenshot #5)
Screenshot #4: 1and1 Domain Overview Page
6. Click on the DNS button and then on the Edit DNS Settings.
Screenshot #5: Select DNS and Edit DNS Settings
.jpg)
At this stage, your will see your domain's DNS settings
7. Under the Basic DNS Settings section, select the "My name server" option as your Name server.
Screenshot #6: Select My Name Server
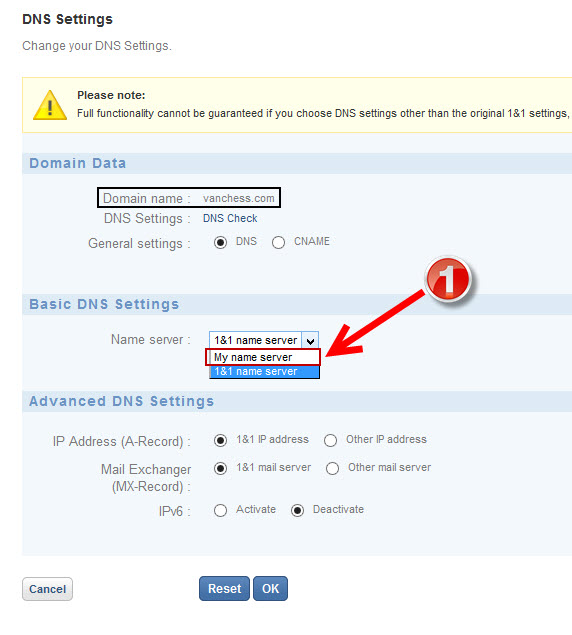
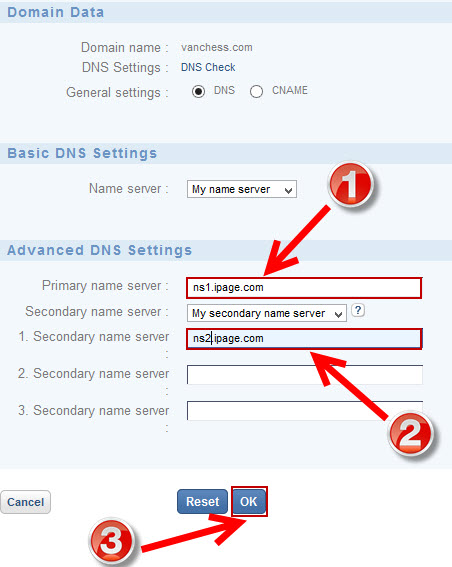
The Advanced DNS Settigns section will appear. If you recall, iPage has provided us with the names of its name servers ns1.ipage.com and ns2.ipage.com.
7. Carefully enter these NameServers under "Primary name server" and "Secondary name server" and then click on the OK button at the bottom of the page.
Screenshot #7: Enter iPage NameServer Settings
If everything has been done correctly, the following window will appear:
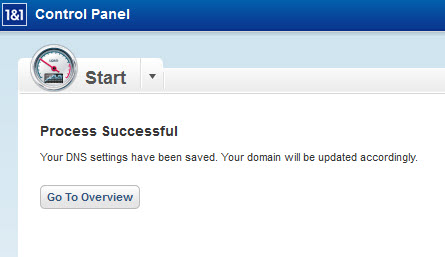
That's right. You've just updated your domain's DNS settings. Just make sure to allow some time for this changes to take place. According to iPage, you may have to wait for about 24 to 48 hours, but this is the worst case scenario. Most of the time, these changes take place in less then a few hours.
After that you are set. Your domain name registered through 1and1.com is now being hosted through your iPage hosting account. Remember, the same principle applies for other domain name registrars and hosting providers. iPage provides the example on how to host your domain name registered through GoDaddy through your iPage hosting account. Click to see this example.